The JetBlack VOLT™ is compatible or adaptable with most road and mountain bikes but may not suit some single speed, recumbent and some thru-axle configurations.
Compatible with:
• 130/135mm Quick Release (Q/R)
• 140/148 Thru-Axle
Rear Wheel Size:
• Road: 650c, 700c
• Mountain: 24”, 26″, 27.5″ and 29″
FREEHUB
The JetBlack VOLT™ comes assembled with an 11 speed Shimano/Sram cassette and compatible body. The VOLT™ is Sram XD-R 12 speed compatible. Please see supplier to fit other types.
Volt is compatible with XD-R but a XD-R freehub body is purchased separately
JetBlack aims to provide the high quality products. However, should you have any issues with your product, please contact your supplier.
The JetBlack VOLT™ comes with a 1-year warranty.
This warranty does not cover damage caused by misuse, abuse, neglect or an accident.
It does not cover general wear and tear, unauthorized modification or failure to follow instructions or warnings in the owner’s manual. It is the responsibility of the purchaser to retain receipt for proof of purchase if a warranty claim is required.
ONLINE REGISTRATION
Register your trainer online for firmware updates or any warranty issues.
WARNING
Most Importantly…

Attach the front and rear legs of the JetBlack VOLT™ using the tools provided.
Short leg is situated to the rear and the long leg to the front of the trainer.
This ensures optimal stability; the front should have the longer side supporting the drive side.

CHANGING TO A CAMPAGNOLO OR XD-R FREEHUB BODY
The stock free hub can be removed with or without the cassette installed. If you choose to remove the cassette prior to removing the free hub, follow instructions below.
1. Remove the Adaptor C nut with the 17mm wrench. Set this aside to use again.

2. Remove the existing free hub by sliding off.

3. If a spacer is supplied with the new free hub body, install this now.

4. Remove the retaining ring from the Campagnolo free hub.
5. Install the free hub on the axle. Twist counter clockwise to help the pawls fall into place. You should not be able to see the pawls.

6. Re-install the Adaptor C nut removed in step 1.

7. Torque the nut to precisely 6Nm.

IMPORTANT: Over-torqueing the nut may cause damage to the bearings. If you do not have a torque wrench, your local bike shop most certainly will!
The JetBlack VOLT™ comes with a pre-installed 11 speed cassette.
Before attaching a 9-speed or 10-speed cassette, you need to first install the 1.8mm cassette washer onto the cassette body, and then secure the cassette tightly on the VOLT™ cassette body.

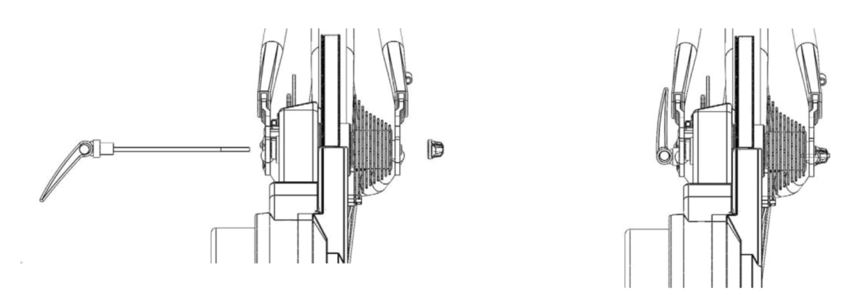
Quick release installation- 130mm or 135mm
1. When using a quick release bicycle frame, you need to use adapter A, adapter B and the quick release kit (these three accessories are included in the package).
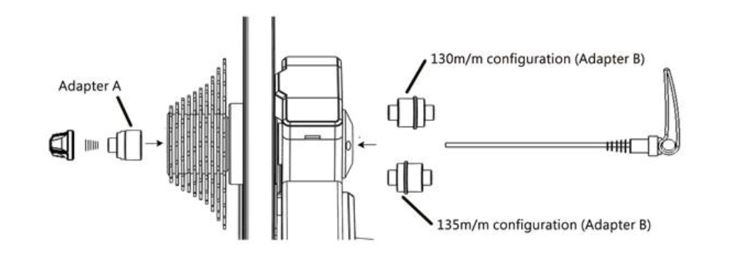
2. Shift the chain on your bicycle to the smallest sprocket on the cassette and then remove the rear wheel.
3. Align the bicycles chain with the smallest sprocket on the trainer cassette, then mount the bicycle frame onto the VOLT™’s axle.
4. Securely tighten the QR axle as you would on your bicycle wheel.
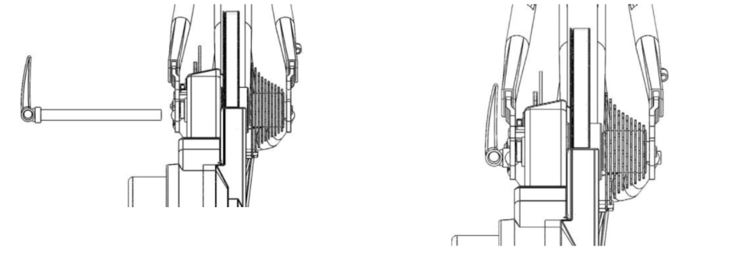
Through axle installation- 142mm or 148mm
1. When using a through axle bicycle frame, you need to use adapters C and D (the two accessories are included in the package).
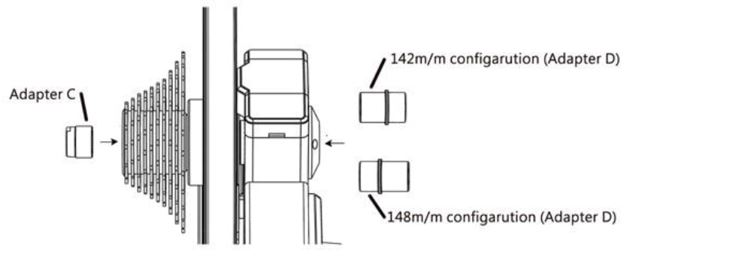
2. Shift the chain on your bicycle to the smallest sprocket on the cassette and then remove the rear wheel.
3. Align the bicycles chain with the smallest sprocket on the trainer cassette, then mount the bicycle frame onto the VOLT™.
4. Insert your through axel and securely tighten as you would on your bicycle wheel.
APPLE IOS
The JetBlack VOLT™ is designed to work with the JetBlack Cycling App which supports devices running iOS 11 and newer.
APPLE APP https://itunes.apple.com/au/app/jb-app-premium/id905818373?mt=8
ANDROID
The JetBlack VOLT™ is designed to work with the JetBlack Cycling App which supports most Bluetooth® compliant Android devices running Android version 5.1 or newer.
ANDROID APP – https://play.google.com/store/apps/details?id=com.jetblack.cycling&hl=en
Note: Since Android devices vary widely, compatibility cannot be assured for all devices.
Note: The JetBlack Cycling App is required for important firmware updates. The JetBlack Cycling App is only available on iOS and Android mobile devices.
WINDOWS / MAC
The JetBlack VOLT™ is compatible with various Windows and Mac App’s run on computers that have Bluetooth and/or ANT+ capabilities.
Attach your bike to the VOLT™ trainer and ensure it is connected to the power source. After 3 seconds the VOLT™ LED display will flash BLUE. This shows the trainer is ready to connect to Apps via Blue Tooth FTMS or ANT+. Ensure all 3rd party Apps are closed on your device.
ENJOY THE RIDE
Attach your bike to the VOLT™ trainer and ensure it is connected to the power source. After 3 seconds the VOLT™ LED display will flash BLUE. This shows the trainer is ready to connect to Apps via Bluetooth FTMS or ANT+. Ensure all 3rd party Apps are closed on your device.
Popular Links
In order to connect a Bluetooth Heart Rate Monitor to the VOLT™ you need to first ‘bundle’ it together with the Bluetooth signal from the VOLT™. IOS devices can only connect to one Bluetooth signal at a time.
Your Heart Rate Monitor is now connected to your VOLT™ Trainer and bundled with your VOLT™ BLE signal. This bundle can now be used with third party App’s.
If you change your trainer or Heart Rate Monitor this process will need to be repeated.
IMPORTANT: ONLY USE the JETBLACK CYCLING App for Firmware updates. Do not attempt to upload other devices firmware. This may cause terminal damage to your VOLT™.
The JetBlack App will notify you when an update is available. Updates will also advertised on the JetBlack Cycling Website.
Ensure the VOLT™ trainer it is connected to the power source and operating correctly. After 3 seconds The VOLT™ LED display will flash BLUE. This shows the trainer is ready to connect to App’s via Bluetooth FTMS or ANT+. Ensure all 3rd party App’s are closed on your device.
NOTE: Updating Firmware can only be done via BLE and with a good Wi-Fi connection. The updating process can take between 30 seconds and 2 minutes depending on connection strength.
We recommend performing a Spin Down Calibration once a month.
IMPORTANT: Only use the JetBlack Cycling App to perform a Spin Down Calibration on the VOLT™ trainer.
Ensure the VOLT™ trainer it is connected to the power source and operating correctly. After 3 seconds the VOLT™ LED display will flash BLUE. This shows the trainer is ready to connect to App’s via Blueooth, FTMS or ANT+. Ensure all 3rd party App’s are closed on your device.
Warm up your trainer for a recommended 10 minutes for the best calibration results.
CONNECTIVITY LIGHT (LED) DISPLAY USING BLUETOOTH
(Once connected to your power source)
CONNECTIVITY LIGHT (LED) DISPLAY USING ANT+
(Once connected to your power source)
LED DISPAY WHEN PERFORMING A FIRMWARE UPDATE
ONLY VOLT 2.0 can be compatible with Zwift Cog & Click. This can be achieved with a firmware update. The VOLT 1.0 is old technology and unfortunately unable to support the firmware update needed to be compatible with Zwift Cog & Click.
WARNING: The firmware upgrade is NOT COMPATIBLE with VOLT 1.0 or JetBlack Whisper Drive. If installed on non compatible units, it could overload the unit and cause sensor or other damage.
DO NOT INSTALL VOLT2.0 Cog and Click firmware upgrade on any other trainer except VOLT 2.0
HOW TO INSTALL THE FIRMWARE UPGRADE
1. Confirm you have VOLT 2.0.


Once you have your code – follow these steps:
2. OPEN JETBLACK SMART TRAINER APP
3. CHECK IT’S WORKING WITH ZWIFT COG & CLICK
The Bluetooth protocol FTMS is the most commonly used Bluetooth protocol adopted by indoor trainers. Some manufacturers use their own protocol which causes problems when using 3rd party App’s. All of the major App’s use FTMS for seamless connection.
Bluetooth is commonly misunderstood in capabilities. The VOLT™ transmits Speed, Cadence and Power as well as Heart Rate all bundled as one BLE signal. Most devices will only accept one BLE signal except Apple TV. If your device is searching for the VOLT™ via Bluetooth, the device will try to connect to every Bluetooth signal available. (ie. sound system, headphones, 3rd party App’s, speed, cadence and power sensors). If you happen to have any other App’s working in the background or even the JetBlack Cycling App open from a previous session, Bluetooth confusion will happen. When connecting to Bluetooth devices and opening App’s (Zwift included) make sure you have closed any App’s that may cause confusion. For a quick fix, navigate to ‘Settings’ on your phone and switch Bluetooth ‘ON’ and ‘OFF’. This will cut connection to other BLE App’s, if the VOLT™ is active it will easily be recognized.
Ensure your Apple TV is the 4K model or later and you have downloaded and opened your preferred App. Zwift, Rouvy, Fulgaz and RGT are all available now on Apple 4k.
Activate your trainer ensuring all older App’s are closed and BLE is disabled.
Unlike smaller devices, Apple TV can handle up to 3 BLE signals. The Apple remote uses one signal leaving two available signals for you to use. We suggest still using the VOLT’s™ bundled BLE signal (Speed, Cadence, Power and Heart Rate) for a simple connection.
All Apple products do not support ANT+. To connect via ANT+ you must purchase an ANT+ Dongle compatible with your device and desired App’s.
Unlike Apple, most Android devices support ANT+. Meaning no Dongle is required.
ANT+ supported devices can be found here.
Ensure you PC supports either Bluetooth or ANT+. If choosing ANT+, for best connection ensure the Dongle and VOLT™ trainer are in close proximity and have clear line of sight.
If using an extension cable to support the ANT+ Dongle, ensure stable connection between both. This is not ideal as in some cases signal transmission can be impaired.
Definition of ERG- a unit of work or energy, equal to the work done by a force of one dyne when its point of application moves one centimeter in the direction of action of the force.
The VOLT™ Erg method uses a complex model of the VOLT Smart’s power to calculate what resistance would be required to achieve the target power at the current speed and temperature. The resistance is adjusted to account for changes in speed and temperature to ensure the target power is met.
Erg mode is great for sustained efforts and for best results base your intervals around cadence. Set your target power then maintain your target cadence. Sudden cadence increases and decreases will affect the stability of your trainer’s target power. The VOLT™ trainer will stop searching ERG (targeted power) at 10kph and restart once the rider goes above 15kph. Most App’s will have a default built into their ERG. We suggest for a great ERG experience for the unfamiliar, use the small chain ring until becoming confident in your technique.
Suggested technique.
When the interval starts, maintain the same cadence until targeted wattage is achieved. You can adjust cadence from here in small increments. Sudden changes will affect the performance of your ERG workout.
The VOLT™ uses an electromagnetic system to apply resistance. An electric current level is calculated and applied to an impermanent magnet to generate an electromagnetic field. The electromagnetic field exerts an electromagnetic force on the magnet, which provides resistance to the VOLT™ trainer in turn applying resistance to the user. This electromagnetic magnet system provides resistance over the conventional gravitational force used in free weights. Other forms of resistance systems used in bike trainers are wind, magnet (non-electrical) and fluid.
The JetBlack VOLT™ maintains a 2.5% accuracy reading. This has been achieved through many hours of testing and firmware design. A calibrated jig attaches directly to the VOLT™ trainer to establish the base power profile. A series of tests are performed using Assomai Pedals, Quark Cranks and SRM Cranks (best in class for testing). The data gathered and analyzed enables JetBlack to achieve the targeted 2.5% accuracy. Our awesome team of electrical engineers design the firmware from this raw data to the smooth, accurate and rider responsive VOLT™ trainer we have now.
We decided early in the piece not to use a strain gauge on the VOLT™. With the huge range of results gathered from testing many power meters and the added problems associated with shipping and handling, air flow, humidity, mechanical design it was decided to use firmware to predict the power output (watts) on the VOLT™.
Through the design process, we noted how different each device was and how it reacted in different scenarios. We have found no two devices recorded the exact same readings. If you were to compare your 3rd party power device with the VOLT™ trainer the potential differences maybe influenced by the following factors:
The VOLT™ is rated to a simulation gradient equivalent to 16%. If you unit becomes very hot with excessive use this gradient may be compromised to support the functionality of the trainer.
Max Power of the VOLT™
This is a measurement of the capabilities of the VOLT™.
The VOLT™ power accuracy has been designed for best performance with a Spin Down Calibration. To get the most accurate readings we suggest using the JetBlack App to complete a Spin Down Calibration. (You will find this in the ‘Settings’ page) DO NOT USE THIRD PARTY SPIN DOWN CALIBRATIONS; this will damage your VOLT™.
Heat plays a big part in the accuracy of your power readings, the warmer the trainer before spin down, the more accurate your readings will be.
The JetBlack VOLT™ uses industry standard protocols (ANT+ FE-c and Bluetooth FTMS) allowing us to connect to most Third Party App’s.
App’s include:

The VOLT™ comes assembled with a 10/11 speed Shimano/Sram cassette and compatible body. The VOLT™ is Sram XD-R 12 Speed compatible. Please see your supplier to fit other types.
If still not resolved…
ANT+ supported devices can be found here.
How to solve issues when your VOLT Smart Trainer Firmware is compromised causing one of the following symptoms:
Steps to resolve

Please ensure procedure completes before disconnecting. Your light will start flashing once the update is completed.
If you are still having issues locating the VOLT, please try LITE BLUE APP to find and locate your Bluetooth device.![]()
DOWNLOAD HERE:
Google: https://play.google.com/store/apps/details?id=com.punchthrough.lightblueexplorer&hl=en&gl=US
iTunes: https://apps.apple.com/us/app/lightblue/id557428110
If your VOLT still does not show up on either the NRF or LITE BLUE APP, the issue is with your hardware unit. Please return to your retailer for warranty support.
We apologize for any inconvenience. JetBlack are working hard to include this procedure as part of the next App update.
To provide the best experiences, we use technologies like cookies to store and/or access device information. Consenting to these technologies will allow us to process data such as browsing behavior or unique IDs on this site. Not consenting or withdrawing consent, may adversely affect certain features and functions.